Creating a message box in Excel VBA (Visual Basic for Applications) is a useful way to interact with users and provide information or gather input. In this article, I will guide you through the process of creating a message box in Excel VBA, covering all the possible, optional, and mandatory parameters. I will also provide example code and explanations for each parameter. Here in this article, I will also cover – How to create a help icon with a help file attached in your message box.
What is a Message Box in Excel VBA?
A message box is a built-in feature in Excel VBA that allows you to display a pop-up dialog box with a message and, optionally, buttons for user interaction. It’s a great way to provide information to users, ask for confirmation, gather input or provide some help information related to the message box or your excel vba application itself.
FREE Download
Do not forget to download the FREE Copy of your workbook which you can use to practise all the codes written here in this article.
Basic Message Box Syntax
First, lets learn the basic syntax to create a message box in Excel VBA.
MsgBox Prompt, [Buttons], [Title], [HelpFile], [Context]
Where:
Prompt (Mandatory): This is the message you want to display in the message box. It can be a string or a variable containing a string.
Buttons (Optional): This parameter specifies the buttons to display in the message box. It can take on one of several values (constants) to determine the button set. You can find a table below with all available button constants. Since this is an optional field, vbOKOnly is the default constant.
Title (Optional): This is the title of the message box, which appears in the window’s title bar. It can be a string or a variable containing a string. If you don’t specify anything, it will show the name of the application.
HelpFile (Optional): This parameter allows you to specify a help file to link to. This is usually used in combination with the Context parameter. The help button would appear only when you use the button code for it.
Context (Optional): Used in combination with the HelpFile parameter to specify a Help context ID.
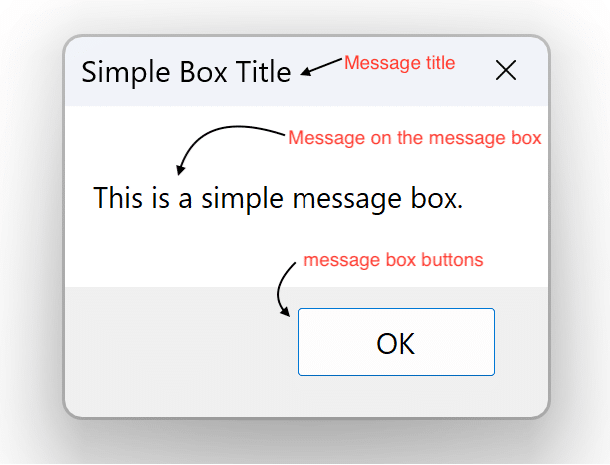
Sample message box in VBA
Before we jump to the examples, here is a table that lists all the different button constants you can use.
| Button Constant Name | Description |
|---|---|
| vbOKOnly | Only OK button is shown |
| vbOKCancel | Shows OK and Cancel buttons |
| vbYesNo | Shows the Yes and No buttons |
| vbAbortRetryIgnore | Shows the Abort, Retry, and Ignore buttons | vbYesNoCancel | Shows the Yes, No, and Cancel buttons | vbRetryCancel | Shows the Retry and Cancel buttons | vbMsgBoxHelpButton | Shows the Help button. For this to work, you need to use the help and context arguments in the MsgBox function | vbDefaultButton1 | Makes the first button default. You can change the number to change the default button. For example, vbDefaultButton2 makes the second button as the default |
Example Code:
Let’s see some example code to demonstrate how to use the MsgBox function with different parameters:
1. VBA Message Box with OK button only [Default]
Message box with OK button only is the default message box.
Sub SimpleMessageBox()
    MsgBox "This is a simple message box.", vbOKOnly, "Simple Box"
End Sub
In this example, we create a simple message box with the message “This is a simple message box,” an “OK” button, and the title “Simple Box.”
2. Create a message box with Yes/No Buttons in VBA
Sub YesNoMessageBox()
    Dim response As VbMsgBoxResult
    response = MsgBox("Do you want to continue?", vbYesNo, "Confirmation")

    If response = vbYes Then
        MsgBox "You chose Yes!"
    Else
        MsgBox "You chose No!"
    End If
End Sub
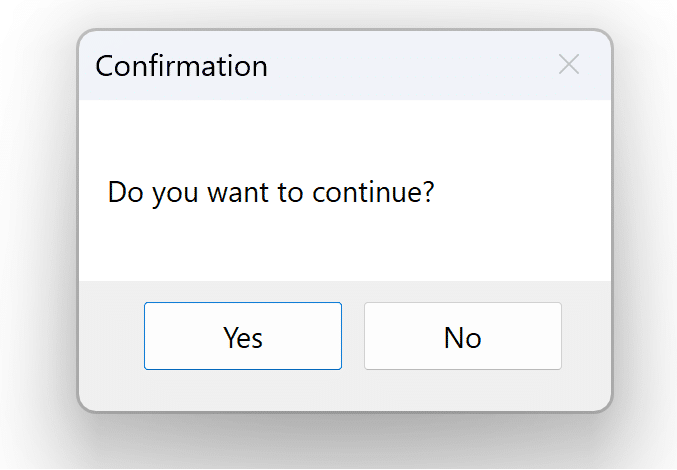
Message Box with Yes/No Button
In this example, we use the vbYesNo constant for the Buttons parameter to display “Yes” and “No” buttons. The user’s choice is stored in the response variable, which we use in an If statement to provide different responses based on their choice.
3. Create a message box with Yes No and cancel Buttons in VBA
Sub YesNoCancelMessageBox()
    Dim response As VbMsgBoxResult
    response = MsgBox("Do you want to save changes?", vbYesNoCancel, "Save Changes")

    Select Case response
        Case vbYes
            MsgBox "You chose Yes!"
        Case vbNo
            MsgBox "You chose No!"
        Case vbCancel
            MsgBox "You chose Cancel!"
    End Select
End Sub
In this example, we use vbYesNoCancel for the Buttons parameter, which displays “Yes,” “No,” and “Cancel” buttons. We use a Select Case statement to handle the different user choices.
Here’s a screenshot of how the message box will look after running the code:
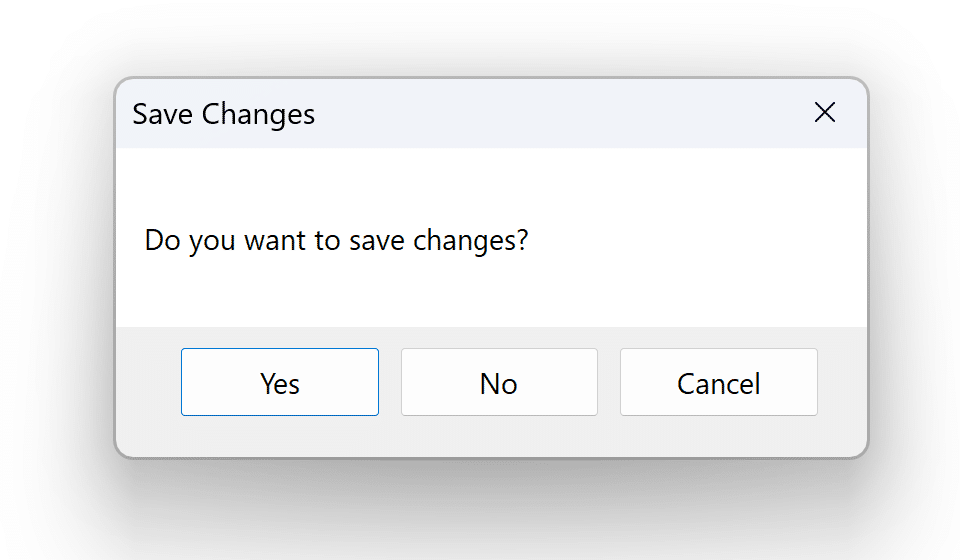
Message Box with Yes/No/Cancel Button
4. Create message box with OK and cancel Buttons
Sub OkCancelMessageBox()
    Dim response As VbMsgBoxResult
    response = MsgBox("Do you want to delete this item?", vbOkCancel, "Delete Item")

    If response = vbOK Then
        MsgBox "You chose OK!"
    Else
        MsgBox "You chose Cancel!"
    End If
End Sub
In this example, we use vbOkCancel for the Buttons parameter, which displays “OK” and “Cancel” buttons. We use an If statement to determine the user’s choice.
Here’s a screenshot of how the message box will look after running the code:
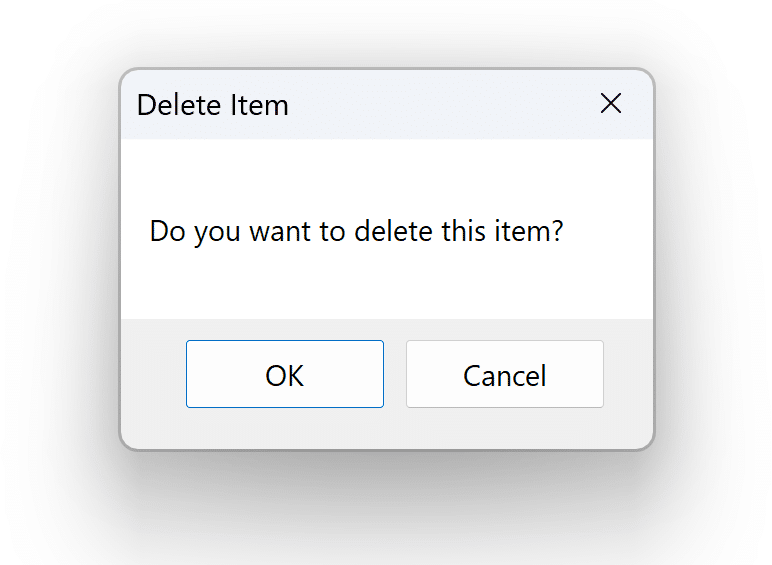
Message box with OK and cancel button
5. Create message box with Help button
Sub CustomTitleAndHelp()
    Dim HelpFile As String
    Dim HelpContext As Long

    ' Define the path to your .chm help file
    HelpFile = "C:\Path\To\Your\SampleHelpFile.chm"

    ' Define the context ID
    HelpContext = 1000

    ' Open the help file with the specified context
    Application.Help HelpFile, HelpContext
End Sub
In the code above, replace “C:\Path\To\Your\SampleHelpFile.chm” with the actual path to your .chm help file, and adjust the HelpContext value to match the context ID you want to use.
This is how message box will look like with help button
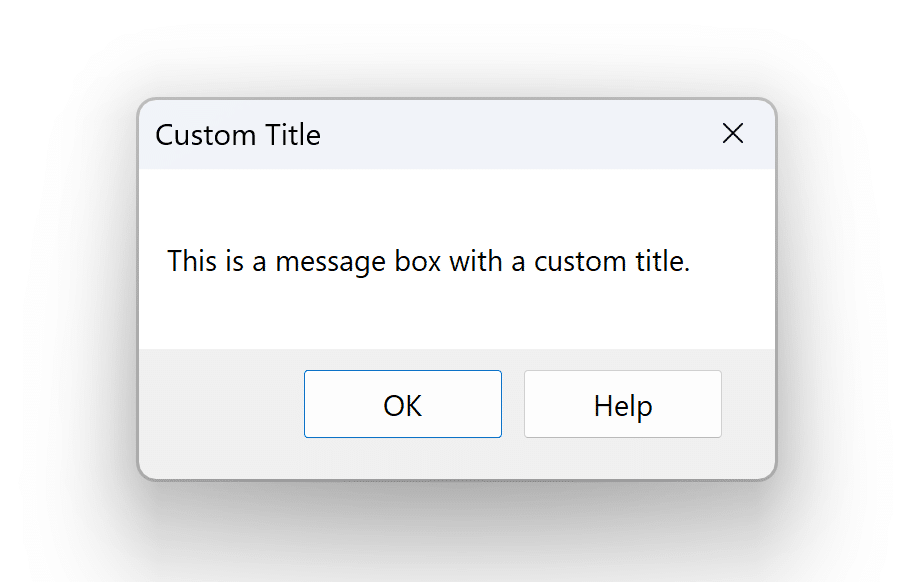
Message box with help button
How to add different types of Icons in Message Box
In Excel VBA, you can display different types of message icons (info, warning, error, etc.) using the MsgBox function. The MsgBox function allows you to specify an icon style using the vbMsgBoxStyle argument.
How to add critical icon in message box?
vbCritical message box style can be used to create a message box with critical icon in the message box as shown in the below screenshot.
Sub CrtiticalMessageBox()
    MsgBox "This is a critical style message box.", vbCritical, "Critical Error"
End Sub
Above code will show the message box something like this.
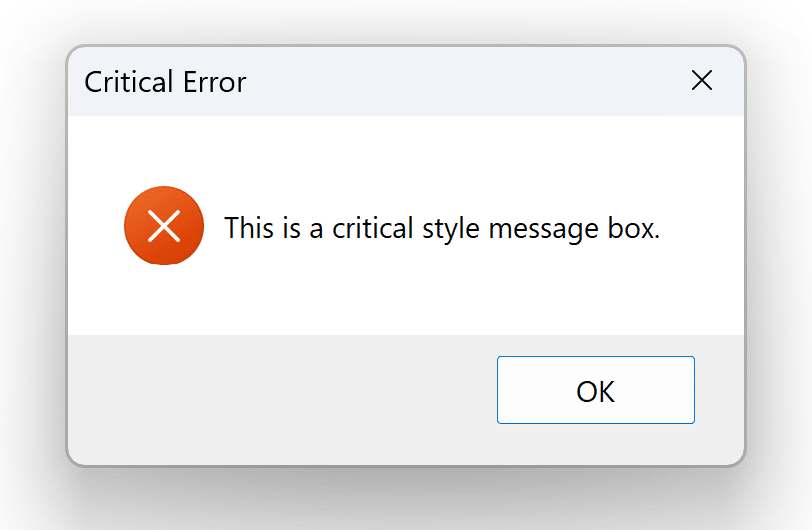
Critical Error icon in Message Box
How to add info icon in message box?
vbInformation message box style can be used to create a message box with info icon in the message box as shown in the below screenshot.
Sub InfoMessageBox()
    MsgBox "This is a information style message box.", vbInformation, "Info"
End Sub
Above code will show the message box something like this.
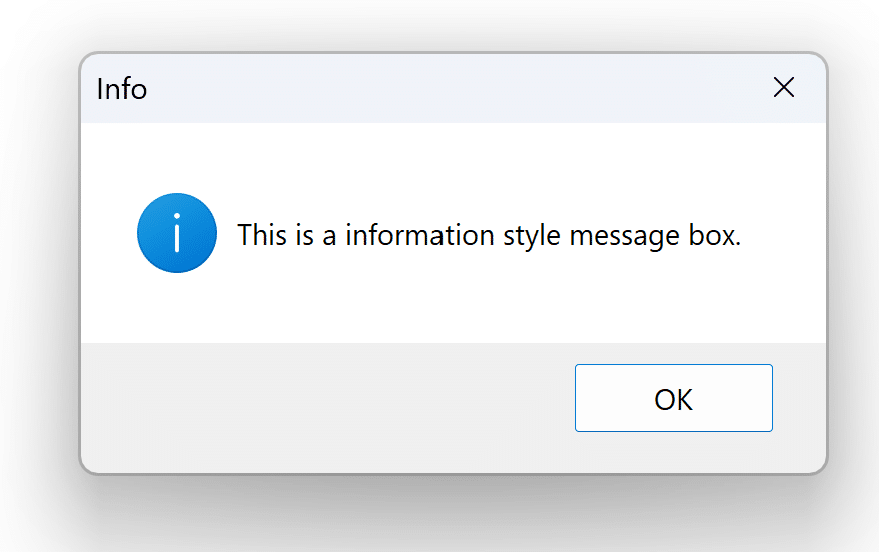
Info icon in Message Box
How to add exclamation icon/ warning icon in message box?
vbExclamation message box style can be used to create a message box with info icon in the message box as shown in the below screenshot.
Sub ExplanationMessageBox()
    MsgBox "This is a warning style message box.", vbExclamation, "Warning"
End Sub
Above code will show the message box something like this.
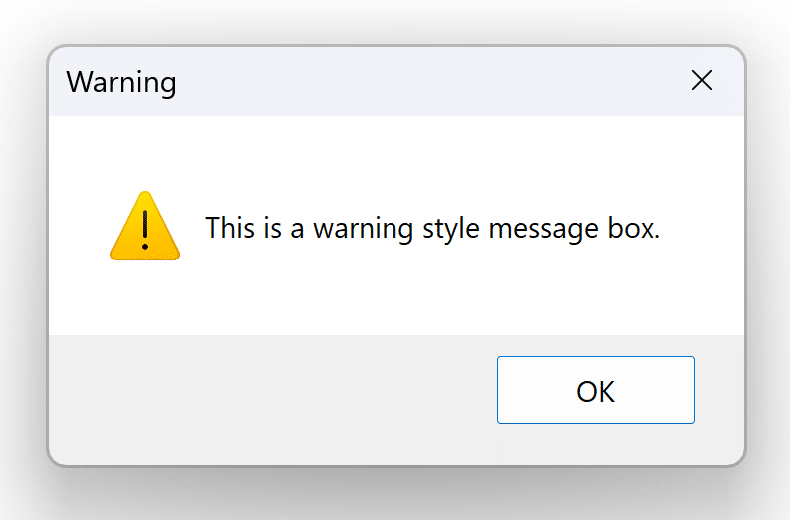
Warning Icon in message box
How to add message box with right aligned message
vbMsgBoxRight message box style can be used to create a message box with a message right aligned in the message box as shown in the below screenshot.
Sub MessageBoxRight()
    MsgBox "This is a long text which should" + vbNewLine + _
    " be displayed on the message box as right aligned", vbMsgBoxRight, "Right Aligned!!"
End Sub
Above code will show the message box something like this.
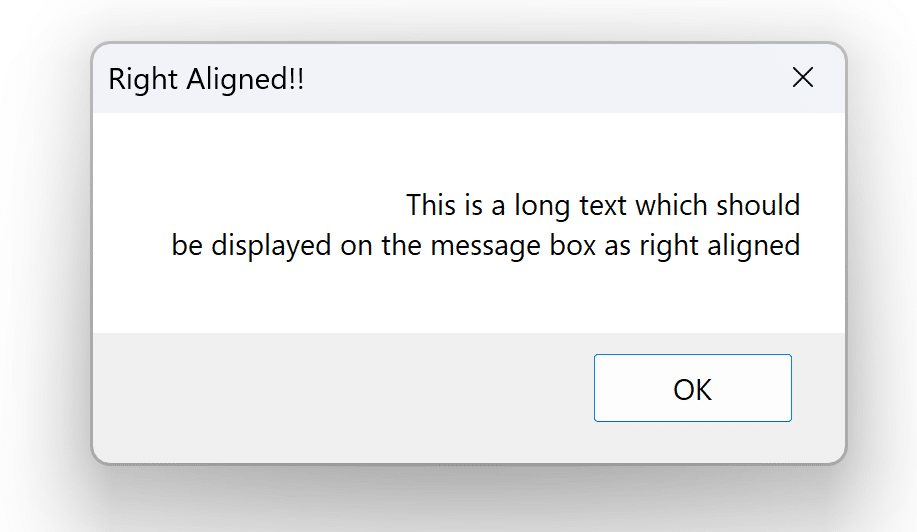
Message box with right aligned message
How to add question icon in message box?
vbQuestion message box style can be used to create a message box with info icon in the message box as shown in the below screenshot.
Sub QuestionMessageBox()
    MsgBox "Are you sure you want to do this?", vbQuestion, "Decision!!"
End Sub
Above code will show the message box something like this.

Question icon in Message Box
How to create .chm help file?
Lets create a simple sample help file. You can use a help authoring tool like HTML Help Workshop to create a .chm file.
Step 1: Download and install HTML Help Workshop from the official Microsoft website.
Step 2: Create a new HTML document using a text editor or HTML editor and write your help content in HTML format.
Step 3: Save this HTML document with an .htm or .html extension (e.g., SampleHelpFile.htm).
Step 4: Compile the HTML document into a .chm file using HTML Help Workshop. Open HTML Help Workshop, go to File > New, add your HTML document, and build the .chm file.
Step 5: Store the .chm Help File in Excel. To use the help file in Excel, follow these steps:
Place the generated .chm file in a location accessible to Excel and your users. You can store it in a network folder or within the same directory as your Excel file.
In the References dialog, check the “HTML Help 1.4” or a similar reference (the version may vary depending on your system). This reference is required for opening .chm help files.
Step 6: Click “OK” to close the References dialog.
Now, let’s modify the VBA code to open the help file with the specified context. You can use the Application.Help method for this purpose.
Message box with help button
Now, you have a step-by-step guide on how to create a sample .chm help file, where to store it, and how to modify your Excel VBA code to use it with a custom title and context.
That’s a basic overview of creating message boxes in Excel VBA. You can tailor these message boxes to your specific needs by adjusting the parameters as required.
Conclusion
Message boxes are a valuable tool in Excel VBA for communicating with users, obtaining input, and providing information. By understanding the parameters and examples provided in this article, you can create customized message boxes that enhance the functionality of your Excel macros.


0 Comments