This is a very simple yet powerful Excel VBA tip for you. Many a time before sending your workbook with Excel VBA Macro code in it, you want to save your workbook without any VBA code in it.
Therefore here in this article, I will show you – how to save your Excel Workbook without excel macro in it.
This can be done manually as well as using Excel VBA.
At the end of this article, I have a usage example of this VBA method. You can also download a FREE Excel Workbook for you to understand and play around.
Method 1: Manual : Save a Copy of Excel workbook without Macro in it manually
Method 2: VBA: Save a Copy of Excel workbook without Macro using Excel VBA
Download an Excel Workbook to play around [FREE DOWNLOAD]
Manual Method: Save Workbook without Excel Macro
Follow the below steps to save a copy of your workbook as Excel Macro FREE. There will be no excel Macro code in the copy saved.
Step 1:
Go to File Option and Click on Save AS of your xlsm file as shown in the below picture:
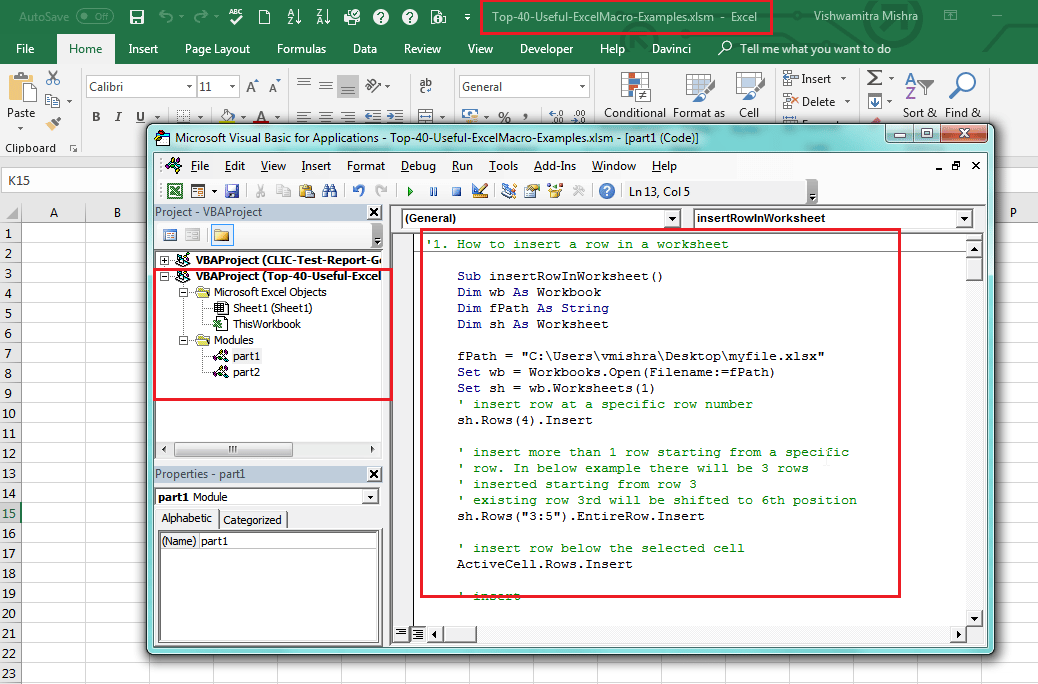
Excel Workbook with Excel Macro in it
Step 2:
Now save your workbook as xlsx and not as xlsm as shown in the below picture
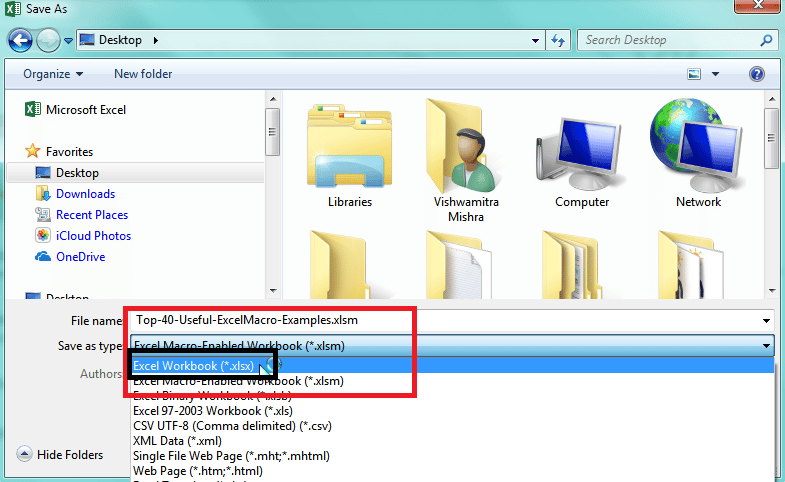
VBA To SaveAs xlsx
Step 3:
On clicking on save, you receive following confirmation popup, once you click on “Yes” then your excel workbook will be saved without Excel Macro code.
Step 4:
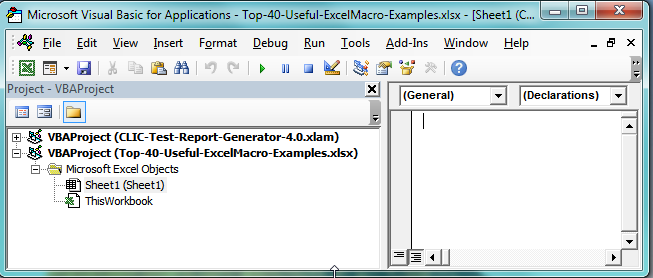
Now once you open your .xlsx workbook, you would not see any of the excel macro code as shown in below picture:
VBA Method: Save Workbook without Excel Macro using Excel VBA
Now as you have seen how to achieve this manually, I will show you how you can achieve this by using Excel VBA.
Following VBA statement will be able to save your Workbook with Excel Workbook as a Workbook without any Excel VBA code in it.
ThisWorkbook.SaveAs Filename:="C:\...\abc.xlsx", FileFormat:=xlOpenXMLWorkbook
While executing the above, VBA statement, you will receive the same confirmation popup as shown above – which you get while saving your .xlsm workbook as .xlsx.
This can be annoying in an automated process. To ignore this popup in Excel VBA code, you simply use Application.DisplayAlerts to false before executing the above statement.
Save Excel workbook as Excel Macro FREE Workbook without confirmation Popup
Refer the below VBA code to save your Excel workbook without saving any VBA code in it.
Application.DisplayAlerts = False
ThisWorkbook.SaveAs Filename:="C:\...\abc.xlsx", FileFormat:=xlOpenXMLWorkbook
Application.DisplayAlerts = True
Example of usage of above Code
You have an excel workbook which has Excel VBA code inside it to generate a report or to perform any automated task. While sending the copy of that excel workbook, you do not want to send all the code, etc. inside it. In such case you can use above code in order to save the workbook as macro free before attaching to the email.
If you want to know more about it, you can read this article here.
Send current workbook as Macro FREE Workbook as an Attachment in email
Using below code, you can send your current workbook without any VBA code in it which already has VBA codes in it. This is one of the best usage of saving a workbook as Excel Macro FREE Workbook.
Before sending your workbook as an attachment in email, you do not want to share the code along-with the workbook, then this piece of code will do the magic for you.
Sub Email_CurrentWorkBook()

    'Do not forget to change the email ID
    'before running this code

    Dim OlApp As Object
    Dim NewMail As Object
    Dim TempFilePath As String
    Dim fileName As String
    Dim originalWB As Workbook
    Dim tempWB As Workbook
    Dim tempXLSXPath As String
    Dim tempXLSMPath As String

    Set originalWB = ThisWorkbook

    With Application
        .ScreenUpdating = False
        .EnableEvents = False
        .DisplayAlerts = False
    End With

    ' Save your workbook in your temp folder of your system
    ' below code gets the full path of the temporary folder
    ' in your system
    TempFilePath = Environ$("temp") & "\"
    fileName = VBA.Left(originalWB.Name, (InStrRev(originalWB.Name, ".", -1, vbTextCompare) - 1))
    fileName = fileName & "-" & Format(Now, "dd-mmm-yy h-mm-ss")

    tempXLSMPath = (TempFilePath & fileName & ".xlsm") ' with macro - as is
    tempXLSXPath = (TempFilePath & fileName & ".xlsx") ' without macro

    ' first an as is copy of this workbook is created
    ' and saved as with Macro in it [.xlsm] format
    originalWB.SaveCopyAs (tempXLSMPath)

    ' Now open this copy of the current workbook
    ' and saveAs a Macro FREE Workbook [.xlsx] format
    Set tempWB = Workbooks.Open(tempXLSMPath)
    With tempWB
        .SaveAs fileName:=tempXLSXPath, FileFormat:=xlOpenXMLWorkbook
        .Close savechanges:=False
    End With

    ' Now open a new mail
    Set OlApp = CreateObject("Outlook.Application")
    Set NewMail = OlApp.CreateItem(0)

    On Error Resume Next
    With NewMail
        .To = "abc@xyz.com"
        .CC = "abc@xyz.com"
        .BCC = "abc@xyz.com"
        .Subject = "Type your Subject here"
        .Body = "Type the Body of your mail"
        .Attachments.Add tempXLSXPath ' attach .xlsx file
        .Send   'or use .Display to show you the email before sending it.
    End With
    On Error GoTo 0

    ' Since mail has been sent with the attachment
    ' Now delete both the temp files
    ' .xlsx and .xlsm
    Kill tempXLSMPath
    Kill tempXLSXPath

    'set nothing to the objects created
    Set NewMail = Nothing
    Set OlApp = Nothing
    Set originalWB = Nothing
    Set tempWB = Nothing

    'Now set the application properties back to true
    With Application
        .ScreenUpdating = True
        .EnableEvents = True
        .DisplayAlerts = True
    End With
End Sub
*************IMPORTANT***********:
In the above code, as you can see, first I have created an exact copy of the current workbook with Macro and then I have saved that copy as a Macro FREE workbook. Strange?? Isn’t it?? Why did not I directly used SaveAs statement to save the current workbook as Macro FREE workbook and then attach it to the email and send?
There is a valid reason for doing so… Before I explain the reason, I would like you to read these two main differences between these two methods…
Difference between SaveAs and SaveCopyAs in Excel VBA
Following are the two main differences between these two methods in Excel VBA…
Difference No: 1 :
After running the SaveAs command, new workbook becomes the current Workbook [in VBA terms – ThisWorkbook]. In other words, after running the SaveAs command, your original workbook will no longer remain opened and accessible [unless you open the original workbook again by providing the Workbooks.Open command].
While SaveCopyAs does it exactly opposite. Here original workbook remains open and copy is made as-it-is with the given file name and path.
This is the reason… why I could not directly use this SaveAs method to save a macro free copy of the current workbook where actually my code is running. So as soon as Save As command is run, then in the current workbook there is no macro any more and code will stop running there and further statements will not be executed any more.
Difference No: 2 :
Using SaveAs you can change many things around your Excel Workbook.. like
1. Secure it by providing a password
2. Change the FileName, FilePath, FileFormat, FileType etc.
any more…
While using SaveCopyAs, all you can do is just change the FileName or FilePath or both. Other than this, you can not make any changes in the workbook. It is simply an AS-IS copy of your workbook.
This is the reason… why I could not just use SaveCopyAs method. By using this method, I can not change for FileFormat of the Workbook as Macro FREE (.xlsx).
Now you understand, why a combination of these two methods was required in order to achieve this scenario of sending a Macro FREE copy of current Excel Workbook as an attachment in an email.




![Distance Calculator in Excel VBA [REVISED]](https://vmlogger.com/excel/wp-content/uploads/sites/11/2019/03/Distance-400x250.gif)

Hello,
Concerning the above presented example – “Send current workbook as Macro FREE Workbook as an Attachment in email” I would like to send attached ONLY a particular Sheet or certain Sheets of a Macro Free Workbook instead of the entire Workbook.
May I have some guidelines in this respect? Many thanks in advance.
P.S. Have tried alternatively the following snippets of code inserted into yours, unfortunately without a satisfactory result. Most often a “Method Failed” result was returned.
//////////////// Here follows the tried out codes /////////////////
For Each Sheet In tempWB.Worksheets
If Sheet.Name “Quotation” Then
Sheets.Delete
End If
Next
//////////////////////////// Or ////////////////////////////////
For s = 1 To Sheets.Count
If Sheets(s).Name “Quotation” Then
Sheets(s).Delete
End If
Next s