In my previous article as you learnt how to split data using VBA SPLIT() function. In this Article I am going to explain you how to separate the data across columns of a cell without excel VBA. Microsoft Excel has a built-in function called Text-to-Columns under Data ribbon (refer the Pic 1). Using this option user can split the data of a cell across columns which are joined by a specific delimiter or fixed length.
How to use Text to Columns Built-in Function of Excel ?
Text to Columns function is easy to use. I am going to make you expert in Text to Column function in 5 simple steps.
5 Steps to spread the data of a cell across columns
Step 1. Select Cell
Select the cell where your data is there to be split across columns
Step 2. Click on Text to Columns Option
Click on Text to Columns Option available under Data Tab as shown in the below picture

Step 3. Choose the Type
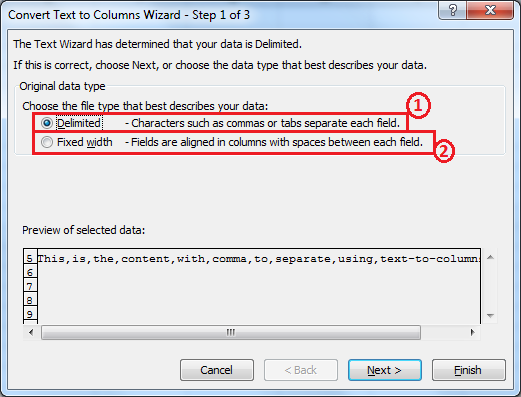
In this dialog box user can choose the type of data which he/she wants to split. As you can see in the below picture there are two options available.
1. Delimiter : Choose this option if your data is joined by a delimiter by which you want to split it.
1. Fixed length : Choose this option if your data does not have a delimiter rather you want to split it by a fixed length. This option will enable user to drag the split bar to adjust it where user wants.
From the above screen i have selected first option as delimiter as my data is delimited by comma (,) delimiter.
Step 4. Choose or enter the delimiter
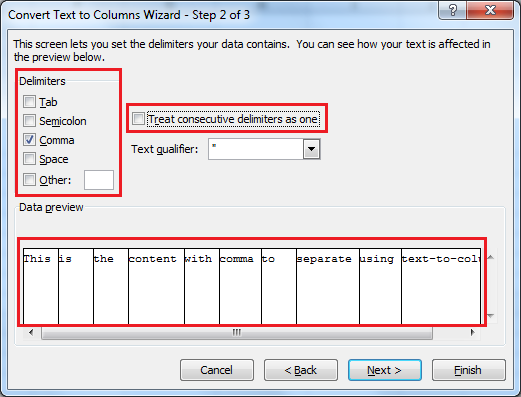
In this wizard user is allowed to select one of the already listed delimiter or you can enter your own delimiter by selecting the Other checkbox as shown in the below picture:
You can see your data preview how it is split the data as shown in the above picture.
Note:
1. If you had selected fixed width option in above Step 3 then you will be allowed to drag the column separator to adjust the width of all the columns.
2. In the above wizard you can see one option as Treat consecutive delimiters as one. This option overcomes the problem which occurs in VBA SPLIT() function. In case of consecutive delimiters, SPLIT() function stores an Empty character as a split item. To know more about this you can refer this article. But here in Text to Columns options you can get rid of this problem by checking this checkbox.
Step 5. Last Step : Select the destination
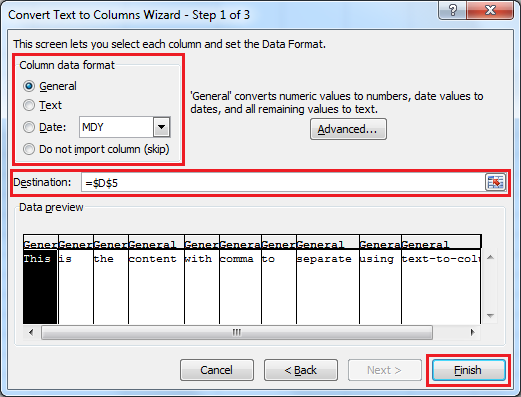
By default destination is selected as the same cell where the data is to be split. This you can choose your own. If you keep the same cell as destination then your original joint data with delimiters will be replaced by the first split. Here I have selected the destination cell as the adjacent column cell in same row. Hence the first split will be put in the destination cell selected and rest all split will be put in to the separate columns as shown in the below picture
Note: Here in this wizard you can choose the format of the column by selecting the particular column from the Data preview as shown in the below picture:
That’s all. Now you are done. Click on Finish and your data of Cell D4 is spread across columns starting from my selected destination cell D5. Refer the below picture:
Your data is spread across columns as you expected without any VBA code. Isn’t this interesting and very useful function of Microsoft Excel? Do you agree with me? Let me know by commenting here !!






0 Comments