One of my friend wanted me to write an article on How can a person achieve making an Excel Cell behave like a password text box which is masked and secured. I have tried to achieve that up to some extent but not 100%. Go through with this article and provide your feedback or suggestion regarding this topic !!. You will find an Excel Workbook with the example to play around with it.
With the help of this Tutorial I am going to explain you – How can you make your excel cell behave like a Password TextBox where your password is masked and no one can see or copy your entered password. At the end of this article you will be able to achieve following things:
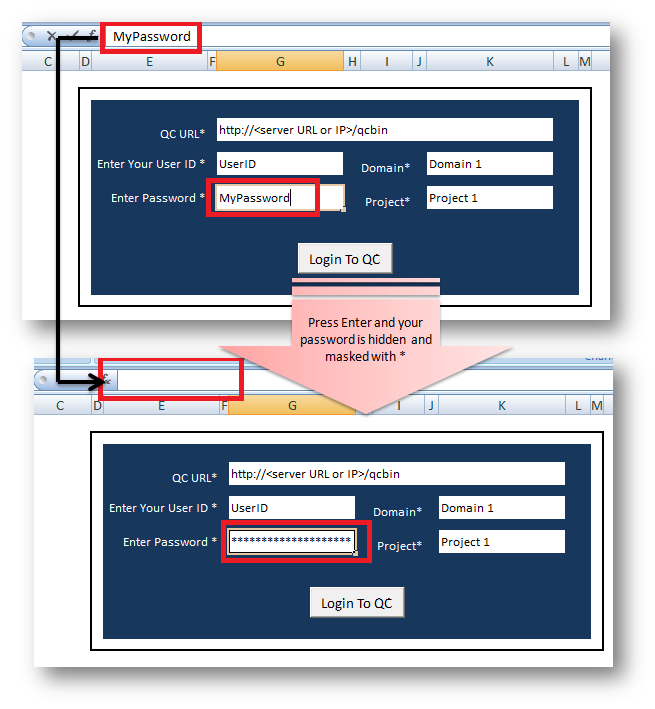
1. Your Password will not be visible to any one (It will be masked like ************ this ). Note that no one can see the password even in the formula bar
2. Copying the password will not be possible too.
3. Once you have typed your password and someone tries to click on the cell to edit it then cell will be cleared and you need to enter your whole password again.
Note:
The only problem with this masking is that typing of the Password can not be masked. It means while typing you will be able to see what are you typing in the cell. You password will be masked and hidden as soon as you come out of that cell.
Before I jump to explain the step-by-step tutorial to make your password cell masked, I would like to tell you that this method is not using any VBA or Excel macro. It is purely done by Excel WorkSheet built-in functions.
Follow the below steps to make your excel cell work as a masked password text box.
Step 1: Set your Cell or Cell Range as Hidden but NOT Locked
First of all you need to decide which range or cells you want to allow users to edit. Why is this required here at first step?? — because this masking is going to be achieved by Protecting the sheet hence you should know those cells which are needs to be made a editable even after protecting the sheet. Refer this article to know how to protect the sheet except few cells or range.
i) Select all your cells or range which has to be made editable (including the Password cell as well)
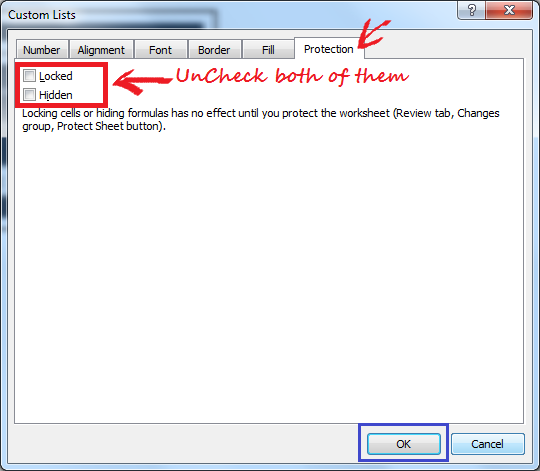
ii) Right Click and go to Format Cells -> Protection Tab as shown in below picture:
iii) Now Select your Password cell which you want to make it as masked.
iv) Right click and again go to Format Cells –> Protection Tab (as shown in above picture)
v) Now Check the Hidden check-box for your Password Cell as shown in the below picture:
Step 2: Custom Masking (Custom Formatting) of Password Cell
Now you need to Custom Format your password cell so that after typing your password it shows ******** a masked password. To do so follow below steps:
i) select the password cell
ii) Right Click –> Format Cells –> Number Tab
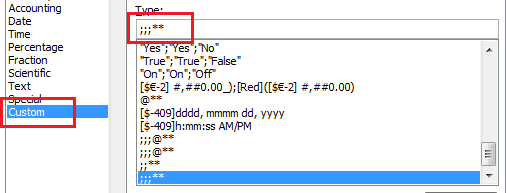
iii) Select category as Custom
iv Enter type as ;;;** and Click OK as shown in below picture:
>
— This formatting will show Star(*) in full cell. It means no matter how many letters you have typed in your cell but once you come out of the cell, your cell will be shown as full of Stars *.
Now you are done with all the necessary formatting which is required before you Protect your Sheet
Step 3: Protect your WorkSheet
Protect your WorkSheet with all default options selected. To know more about protecting a WorkSheet..read this article. It is recommended that you pass a valid password to protect your sheet if you really want to make your password protected 🙂
Yes now you are done with your Password Cell masking without using a Text Box. Let’s see few examples
Example:
I have created one Excel WorkSheet by following the above steps for Simple Login page to login in to HP Quality Center.
Those who are from Testing or Development team, may be knowing about HP Quality Center :). For those who does not know – HP QC is Test Management Tool used for complete test management like, requirement management, test case management, defect management etc. That application can be accessed through VBA to fetch different kind of data and reports. To know more about the HP QC related VBA codes go through the HP QC VBA tutorial page.
In this example I have created a Protected Sheet (password: Vishwa123) with a password field which is masked. Refer the below picture on how masking is happening in the sheet as soon as you come out of the cell after typing your password. (Note: You can not copy or edit an already typed password)
Important Point to Note:
Password masking was done with above method easily. But what is the impact on a VBA code which is going to read this particular cell value. Cell G11 is the password cell in the above example. There to read this value in VBA you can write a simple statement like:
varPWD = Range(“G11”).value
But the question is: Will the above statement return the hidden and masked password?? And the ANSWER is a BIG NO. Above statement will always return an empty password. Then what is the solution read the hidden password in my VBA code. If this is not possible then there is no use of above masking 🙂
Solution
To read the above masked and hidden password you need to put a VBA statement to UnProtect the Sheet and then read the password and then again protect the sheet back with the same password. Hence the above simple statement will be replaced by the below statements:
'First Disable the  Screen updating so that
'user does not see any password while VBA
'Unprotecting/protecting the Sheet
Application.ScreenUpdating = False
'Now UnProtect the Sheet
WorkSheets("Sheet3").Unprotect Password:="Vishwa123"
'Read the password field Value now
qcPassword = Range("G11").Value
'Again protect the sheet back with the same password
WorkSheets("Sheet3").Protect Password:="Vishwa123"
'Now enable the screen update back
Application.ScreenUpdating = True
VBA Code to Connect to Quality Center with a Masked and Hidden Password Cell
Function Connect_To_QC
Dim qcURL As String
Dim qcID As String
Dim qcPassword As String
Dim qcDomain As String
Dim qcProject As String
Dim tdConnection As Object

'To read all visible values from the cells
qcURL = Range("qcURL").Value
qcID = Range("qcID").Value
qcDomain = Range("qcDomain").Value
qcProject = Range("qcProject").Value

'To read the hidden password
Application.ScreenUpdating = False
Worksheets("Sheet3").Unprotect Password:="Vishwa123"
qcPassword = Range("qcPassword").Value
Worksheets("Sheet3").Protect Password:="Vishwa123"
Application.ScreenUpdating = True

On Error GoTo err
'Display a message in Status bar
   Application.StatusBar = "Connecting to Quality Center.. Wait..."
' Create a Connection object to connect to Quality Center
   Set tdConnection = CreateObject("TDApiOle80.TDConnection")
'Initialise the Quality center connection
   tdConnection.InitConnectionEx qcURL
'Authenticating with username and password
   tdConnection.Login qcID, qcPWD
'connecting to the domain and project
   tdConnection.Connect qcDomain, qcProject
'On successfull login display message in Status bar
   Application.StatusBar = "........QC Connection is done Successfully"
   Exit Sub
err:
'Display the error message in Status bar
Application.StatusBar = err.Description
End Function
Download your FREE WorkBook
Get your free workbook to download and play around:) Enjoy !


Hi, just wanted to mention, I liked this blog post. It was inspiring.
Keep on posting!
Hey i saw your solution you posted and tried the method.
however there is a loophole to this where i can just copy the cell and then open a new excel file and paste to it. then i will be able to see the password.
when im doing this it works in cell but shows the character contains in that in formula bar
Doesn’t work. The cell can be copied and pasted into a new Excel sheet, and the true content will be displayed in the formula bar. You didn’t think of this???
Thanks David,
As mentioned this is ofcourse not a fully secure thing to do. You are right copy paste feature should be disabled to make it more secure. Thanks for your feedback. I appreciate this.