Excel Trick – SMART Method to make White Background

.

Dear Readers,
 
If you are a Microsoft Excel user then you must have come to a situation where you want to show you data in a particular area and rest all the area you want to make it plane white (without lines or grid). Something like depicted in below image:
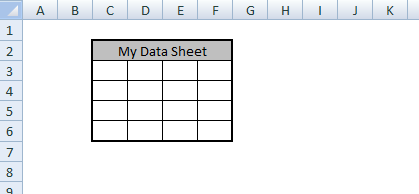
My Data Sheet - Formating Trick

My Data Sheet - Formating Trick

How do we do this formatting GENERALLY?

Generally we follow the below steps to achieve this formatting:
Step 1.
Select the whole sheet by clicking on the corner of the sheet
How to Select Whole Sheet in one Click
Step 2.
Now Select “No Border” as shown in Image
Select No-Border
Step 3. Your whole sheet looks something like this
Grey grid-lines
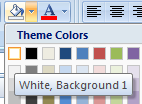
Step 4. Now you fill white color in it.
Fill white-color
Step 5. Format your data area in whatever format you want to. Rest all will remain as while plain background.

Now you are done with your formatting !!

Same formatting mentioned above can be achieved in a SMARTER way

A SMART way of doing the above formatting

Follow the below steps:
Step 1.
Select the whole sheet by clicking on the corner of the sheet
How to Select Whole Sheet in one Click
Step 2.
Now Select “No Border” as shown in Image
Select No-Border
Step 3. Format your data area in whatever format you want to.
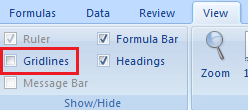
Step 4. NOW THIS IS THE SMART STEP – Rather filling White color in rest all the cells you just select the whole sheet and “Uncheck” the “Gridlines” checkbox under “View” tab in the Ribbon:
Uncheck Gridlines Checkbox

Now you are done with your formatting !!

Why Second method is Better than the First One?

There are 3 benefits of doing so:

1. Faster

This formatting can be achieved simply after or before your “Data Area” formatting. But if you are doing it by first method then you should first do the background formatting and then your data area formatting. If missed to do so then your data area formatting will be overridden by this formatting but this is not the case with the second method. That is why I call it as “SMART” method as well.

2. File Size

Size of the Workbook with the first formatting method is always more than the second method used. I have created 2 Workbook with 4 Sheets in each workbook.
In all the 4 sheets I did the same formatting as above using both the methods and you can see the file size using the Method 1 and Method 2 as show below:

Fill White Color  and No Gridline
Fill White Color and No Gridline

Try doing the second method for such formatting. You can find it easy and lighter 😛

Cheers !!! Got simply another BETTER way of doing things in Excel

Buy a coffee for the author

Adsense

Download FREE Tools and Templates

There are many cool and useful excel tools and templates available to download for free. For most of the tools, you get the entire VBA code base too which you can look into it, play around it, and customize according to your need.

Convert PDF Tables to Excel with VBA | Step-by-Step Guide

Convert PDF Tables to Excel with VBA | Step-by-Step Guide How to Convert PDF Tables to Excel Using Excel VBA (Macros) Extracting data from PDF tables into Excel can be tedious, but with Excel VBA (macros), you can automate this process and save time. This guide will...

Dynamic Arrays and Spill Functions in Excel: A Beginner’s Guide

In today's tutorial, we'll be diving into the exciting world of dynamic arrays and spill functions in Office 365 Excel. These features have revolutionized the way we work with data, providing a more flexible and efficient way to handle arrays. I am going to explain...

How to Declare a Public Variable in VBA

While programming in VBA sometimes you need to declare a Public Variable that can store the value throughout the program. Use of Public Variable: Let's say you have 4 different Functions in your VBA Code or Module and you have a variable that may or may not be...

What is Excel Formula?

Excel Formula is one of the best feature in Microsoft Excel, which makes Excel a very very rich application. There are so many useful built-in formulas available in Excel, which makes our work easier in Excel. For all the automated work, Excel Macro is not required. There are so many automated things can be done by using simple formulas in Excel. Formulas are simple text (With a Syntax) which is entered in to the Excel Worksheet Cells. So how computer will recognize whether it is a formula or simple text? Answer is simple.. every formula in Excel starts with Equal Sign (=).

You May Also Like…

VBA: Reverse a string

It is very easy to get the Reverse of a string entered by user in Excel VBA by using VBA inbuilt functionality....

read more

3 Comments

  1. Avinash Dubey

    Hey Vishwa,

    Background is changed as per the second method but I want unused space disabled. I mean, the cells where user has provided the data can be formatted and rest of the cells (unused) should be white and disabled.

    Please post this topic.

    Thanks,
    Avinash

    Reply
    • Vishwamitra Mishra

      Thanks Avinash for your quick feedback.
      I will discuss about your topic in my Next post which will be posted tomorrow.

      Reply

Trackbacks/Pingbacks

  1. Learn Excel Macro Excel Trick - Sheet Protection - Protect it and Stay Free - [...] to explain you, How to protect your whole sheet except a cell or cell range. One of my avid…

Submit a Comment

Your email address will not be published. Required fields are marked *

This site uses Akismet to reduce spam. Learn how your comment data is processed.

Join and get a FREE! e-Book

Don't miss any articles, tools, tips and tricks, I publish here

You have Successfully Subscribed!

Pin It on Pinterest